Apr 04

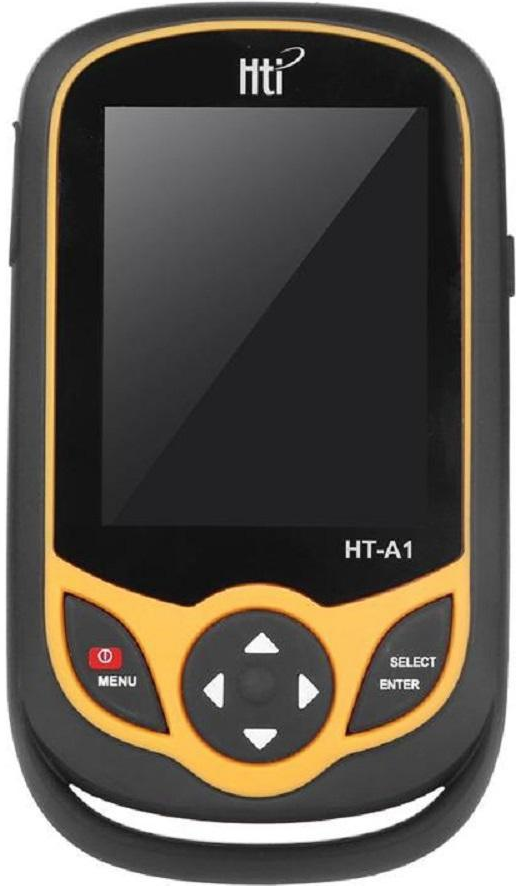
This is part 2 of my hacking adventures on the HT-A1. To see part 1, click here

Mounting the USB-hub and WiFi-module never came to be (i lost interest and figured it would be hard to add the missing features in software since i’m no expert at embedded linux and i don’t have the sources for the software the camera is running.

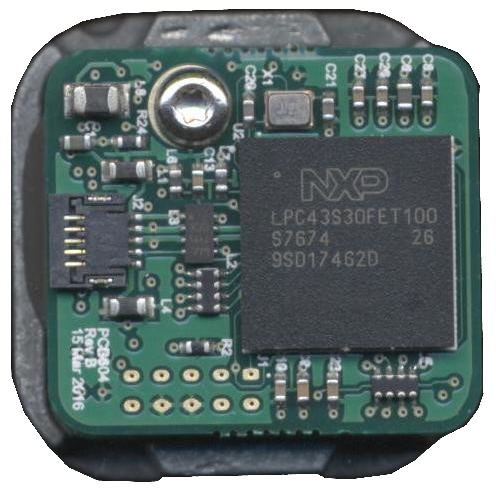
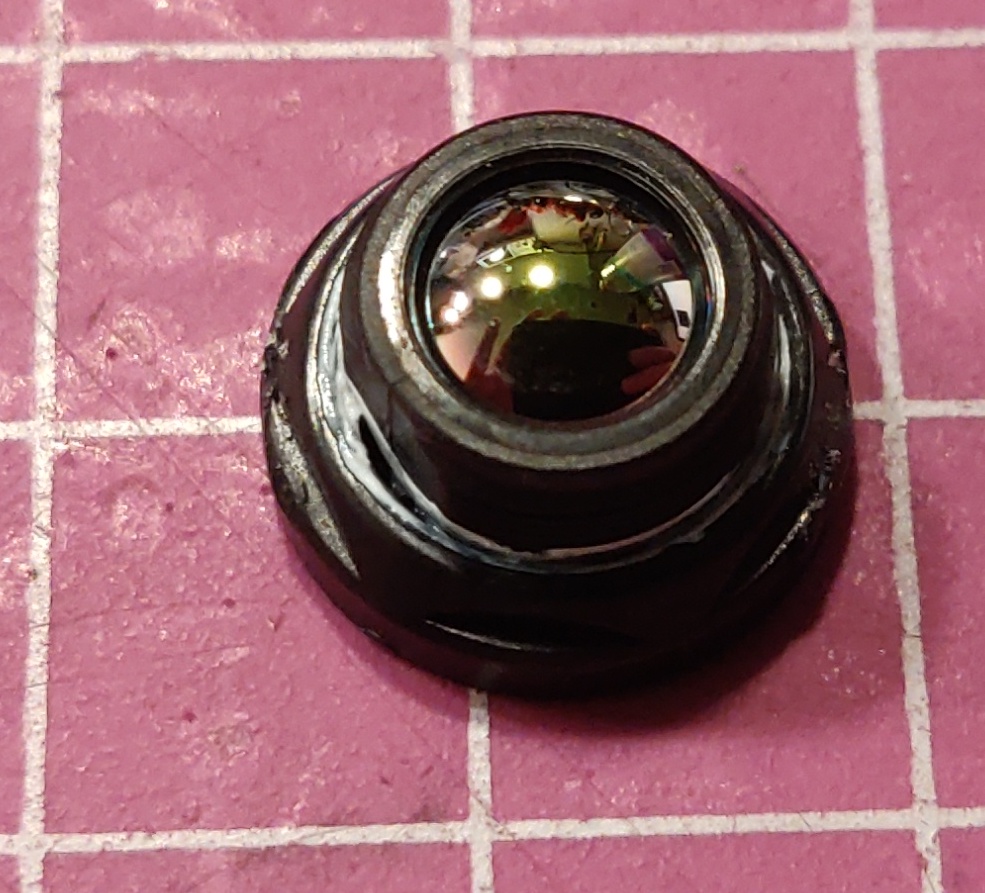
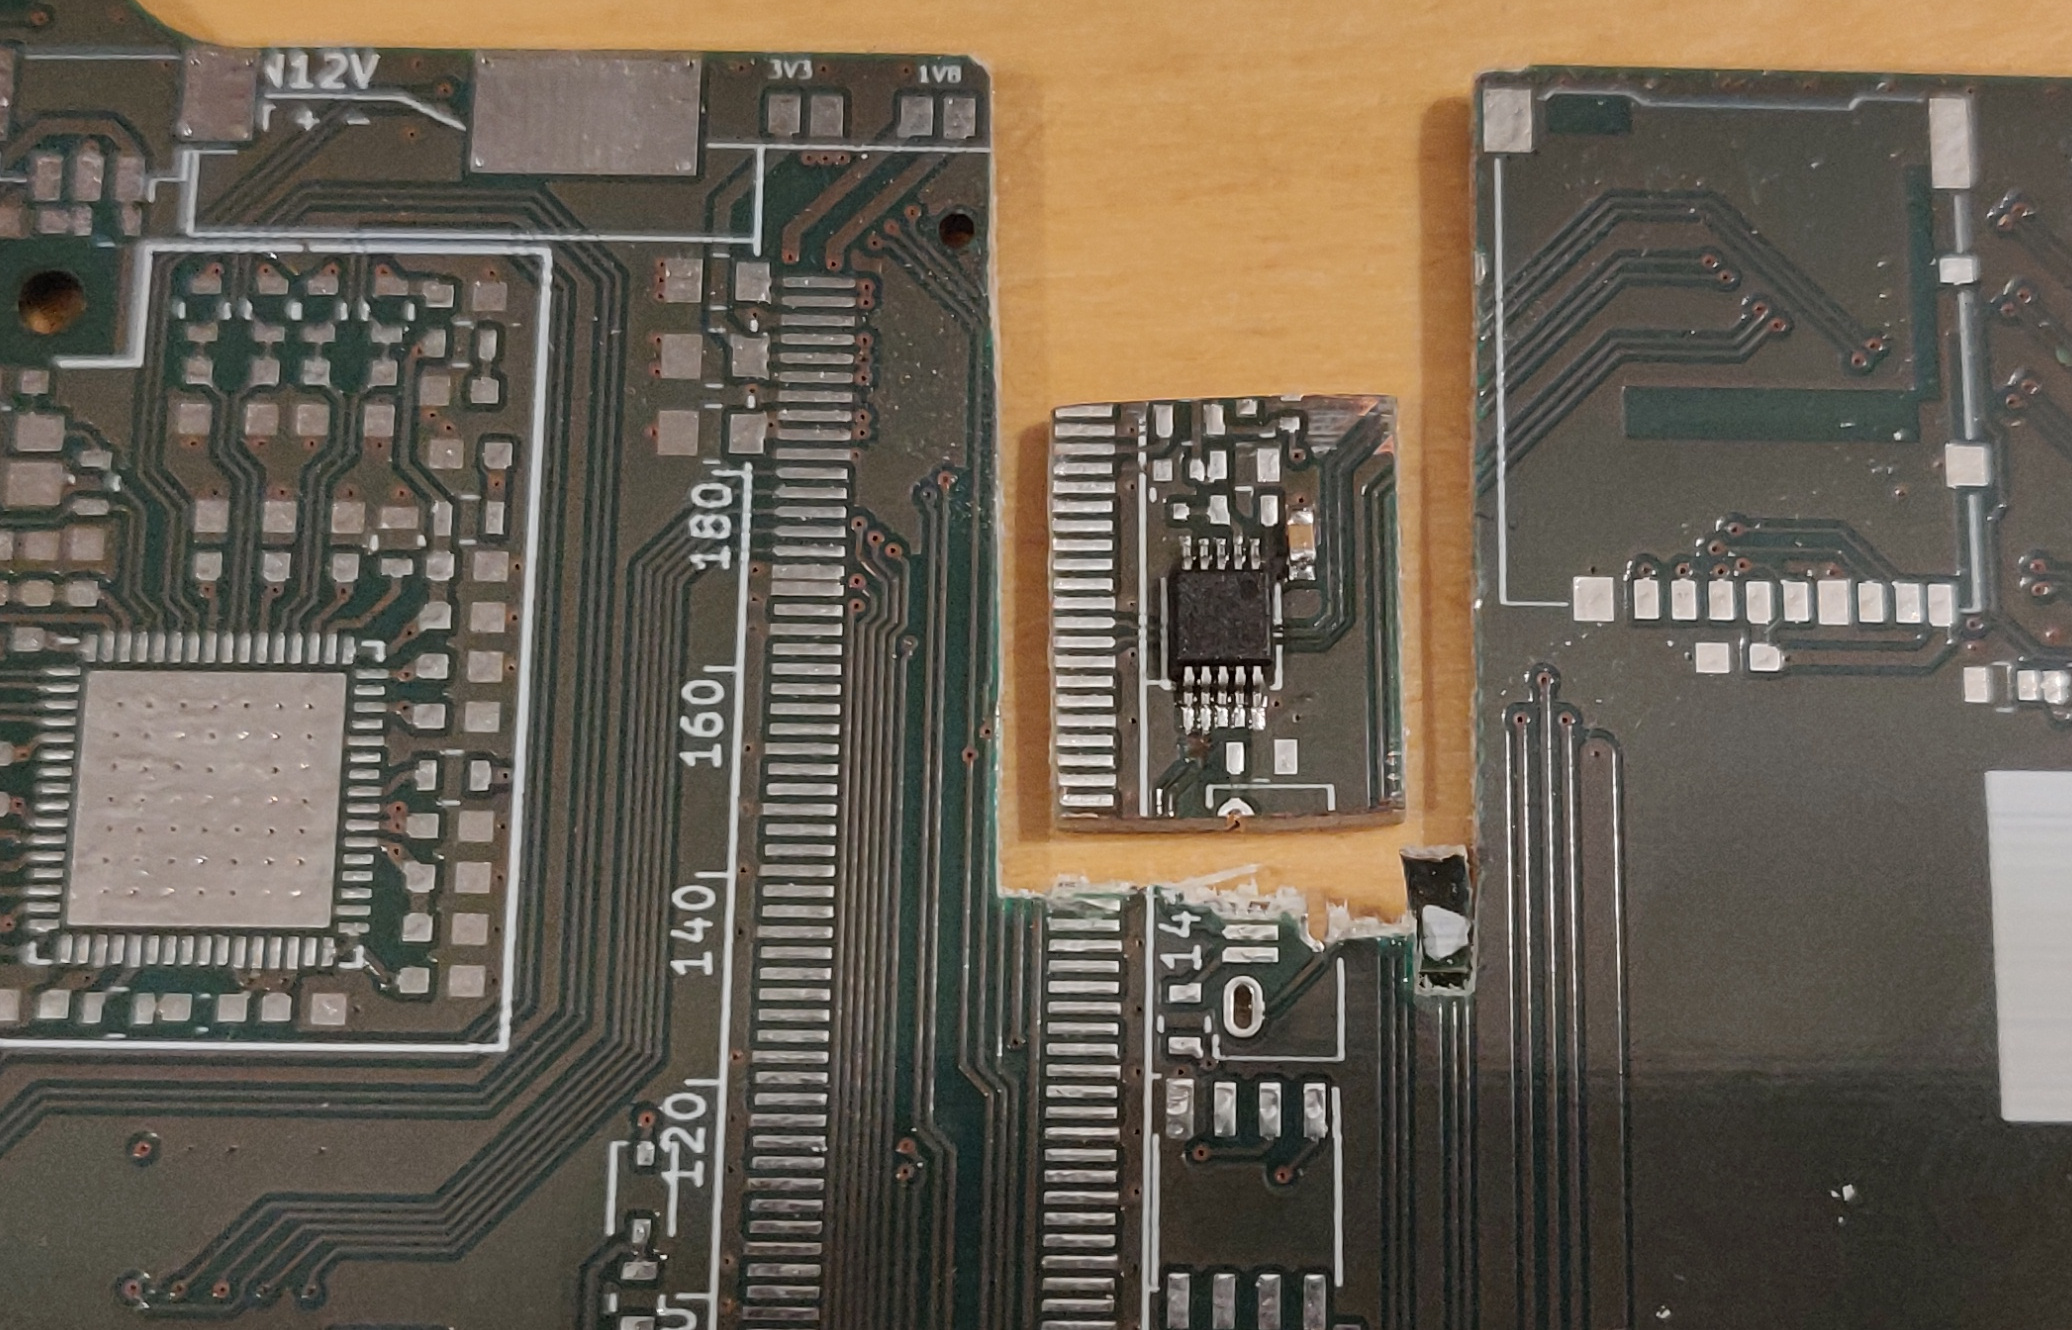
Browsing the internet it became apparent that Seek is now officially stating that they sell OEM modules and you can buy a development kit with SDK etc. I had a look at their pictures and it was clear that the module that the HT-A1 is using a variant of their “Mosaic” thermal core.

Now, what happens if i load the Seek app and connect this to my smartphone? Will the app recognise the module?

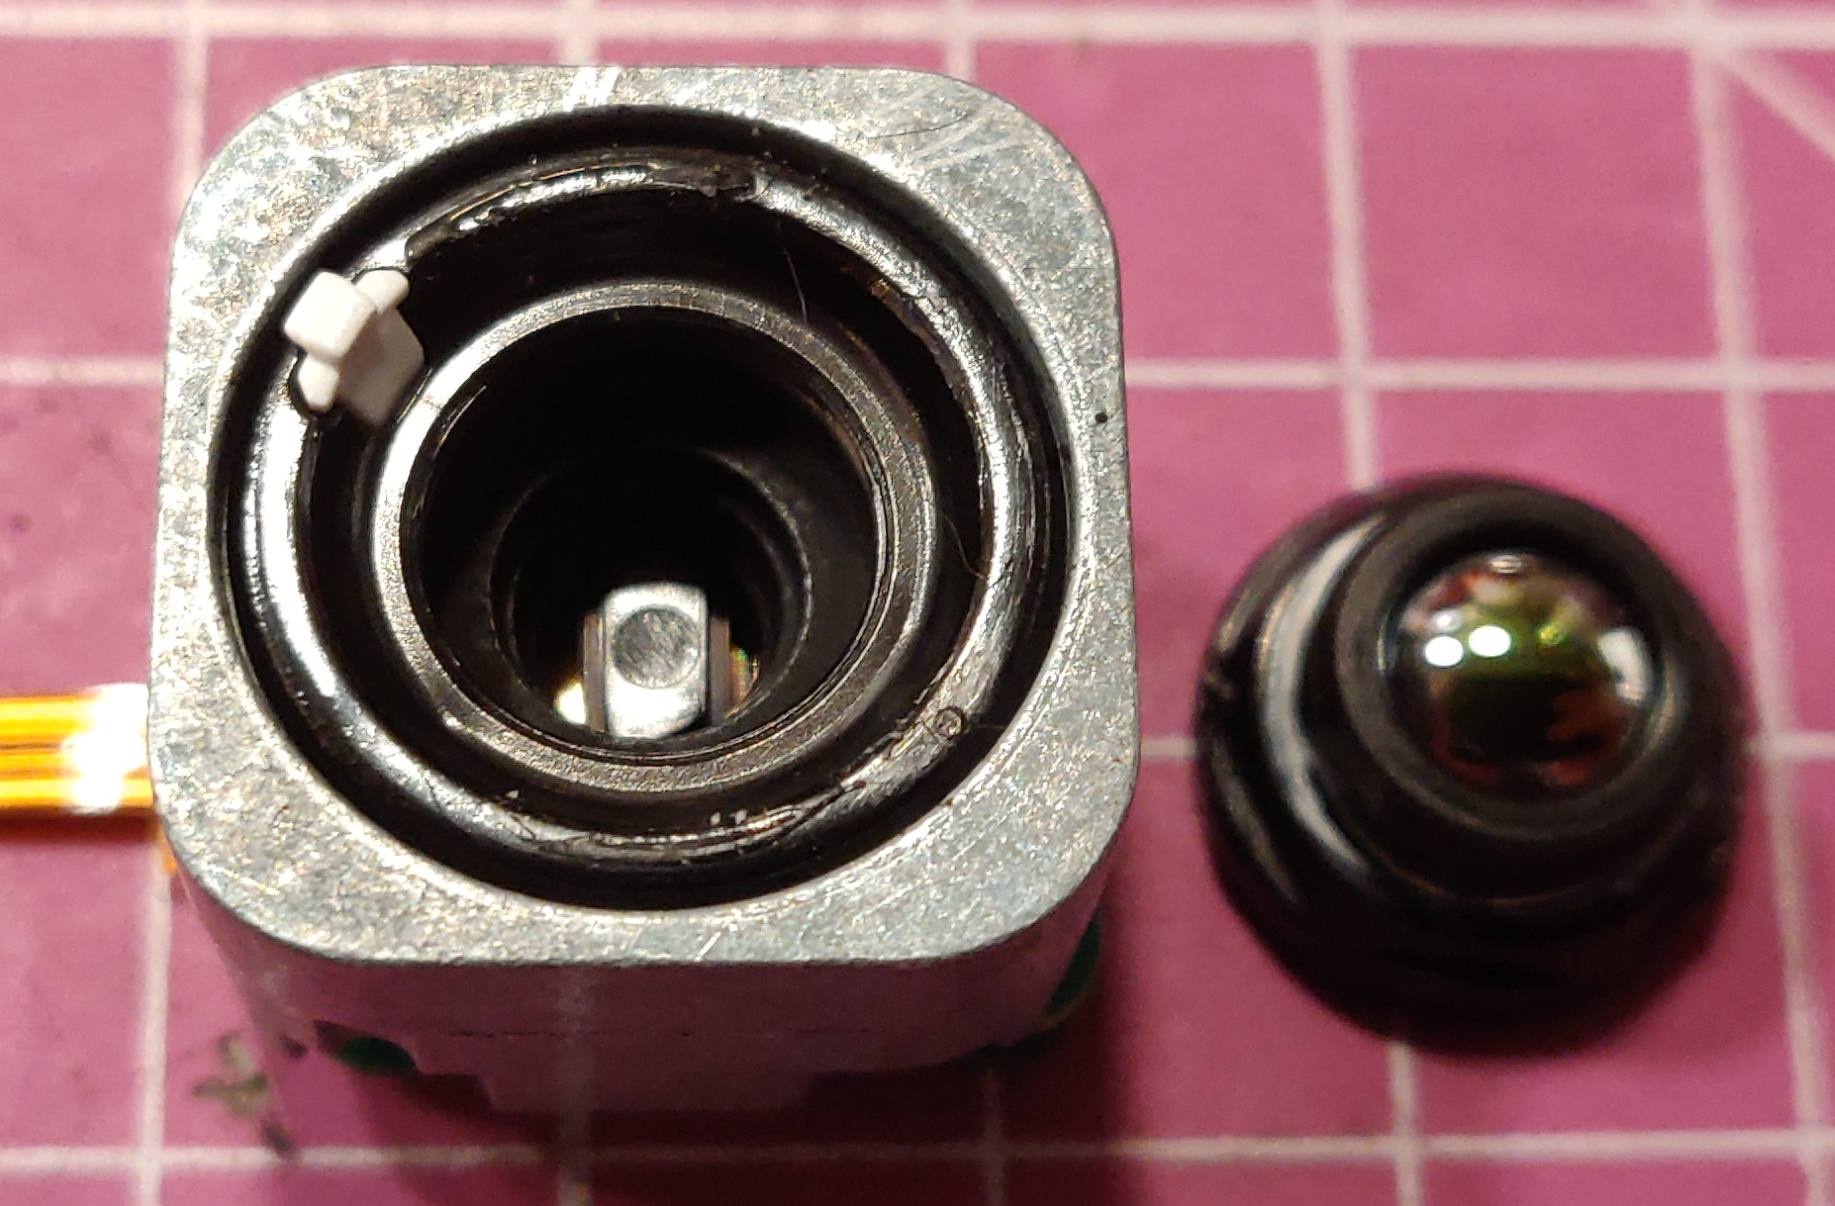
Well only one way to find out i think. I found a suitable piece of flat flex cable that handily went from the 0.5mm pitch to 1mm pitch (so soldering would be a tad easier) I cut it to size so it would fit the small 5 pin connector on the Mosaic core. The docs from Seek says that the Mosaic core is good from 3.3 to 5.5V. I didn’t immediately saw any reasonably sized voltage regulator on the module from the HT-A1 so instead of taking any chances i put two standard 1N4007 diodes in series with VCC to drop the voltage to 3.6V.

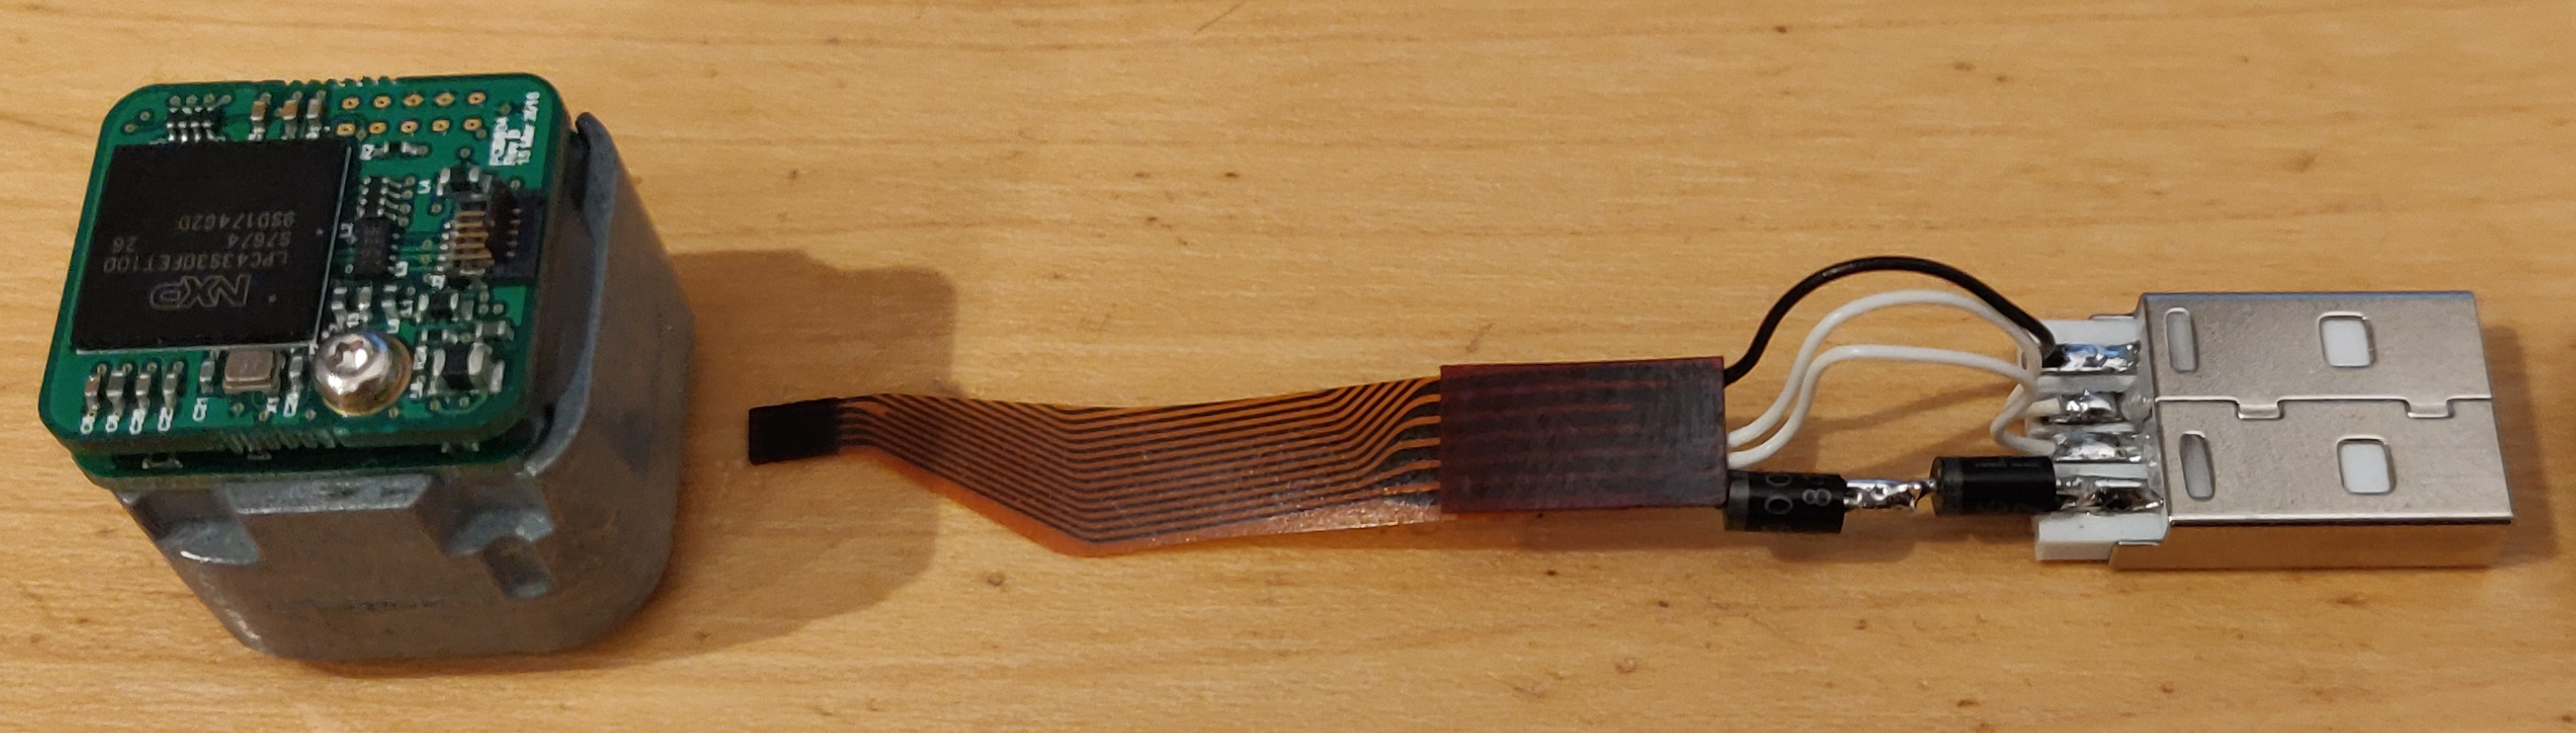
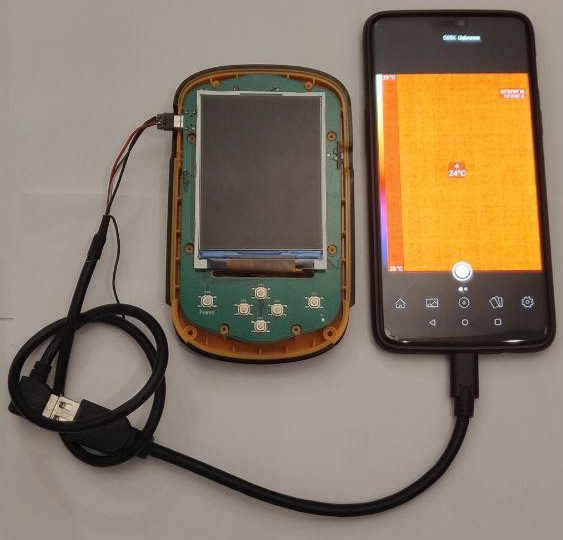
I made a concoction of this custom cable and an USB-C OTG cable that would plug into my Oneplus 6-phone.

I went into settings on Android and turned on OTG support so the port would supply power, plugged in the cable and was met with a friendly popup asking if i would allow Seek Thermal to access PIR206 Thermal Camera? – Hell yes!

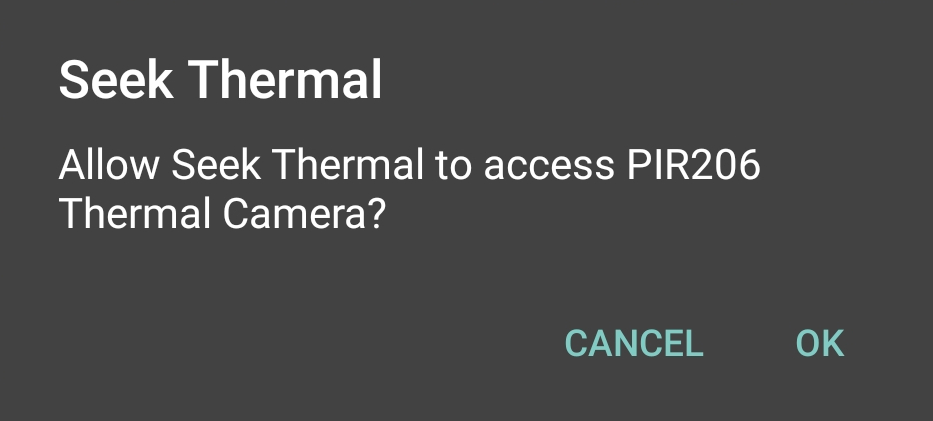
Pressing OK, nothing more happened. I opened up the Seek app and in the top it said “Unknown” as connected. Pressing the name opened up the preview – it works 😀

OK. This is awesome. Now i can actually use the thermal core in my HT-A1 to record videos via the app.

I don’t want to gut the HT-A1 since i really like have dedicated hardware for a job – that was also the reason i went with the HT-A1 instead of a Seek dongle or similar device that plugs into a phone. I don’t want to leave my phone in a test setup etc, or even worse having a product that eventually gets obsoleted because the app isn’t updated anymore. I could see that happeing very well if you had one of these for an iPhone.

But not having the possibility to record video really detracted from the dream of having the dedicated hardware.

So how do i connect the Thermal core to my phone without drilling any extra holes in the HT-A1 case and installing extra plugs and switches? With some trickery of course!

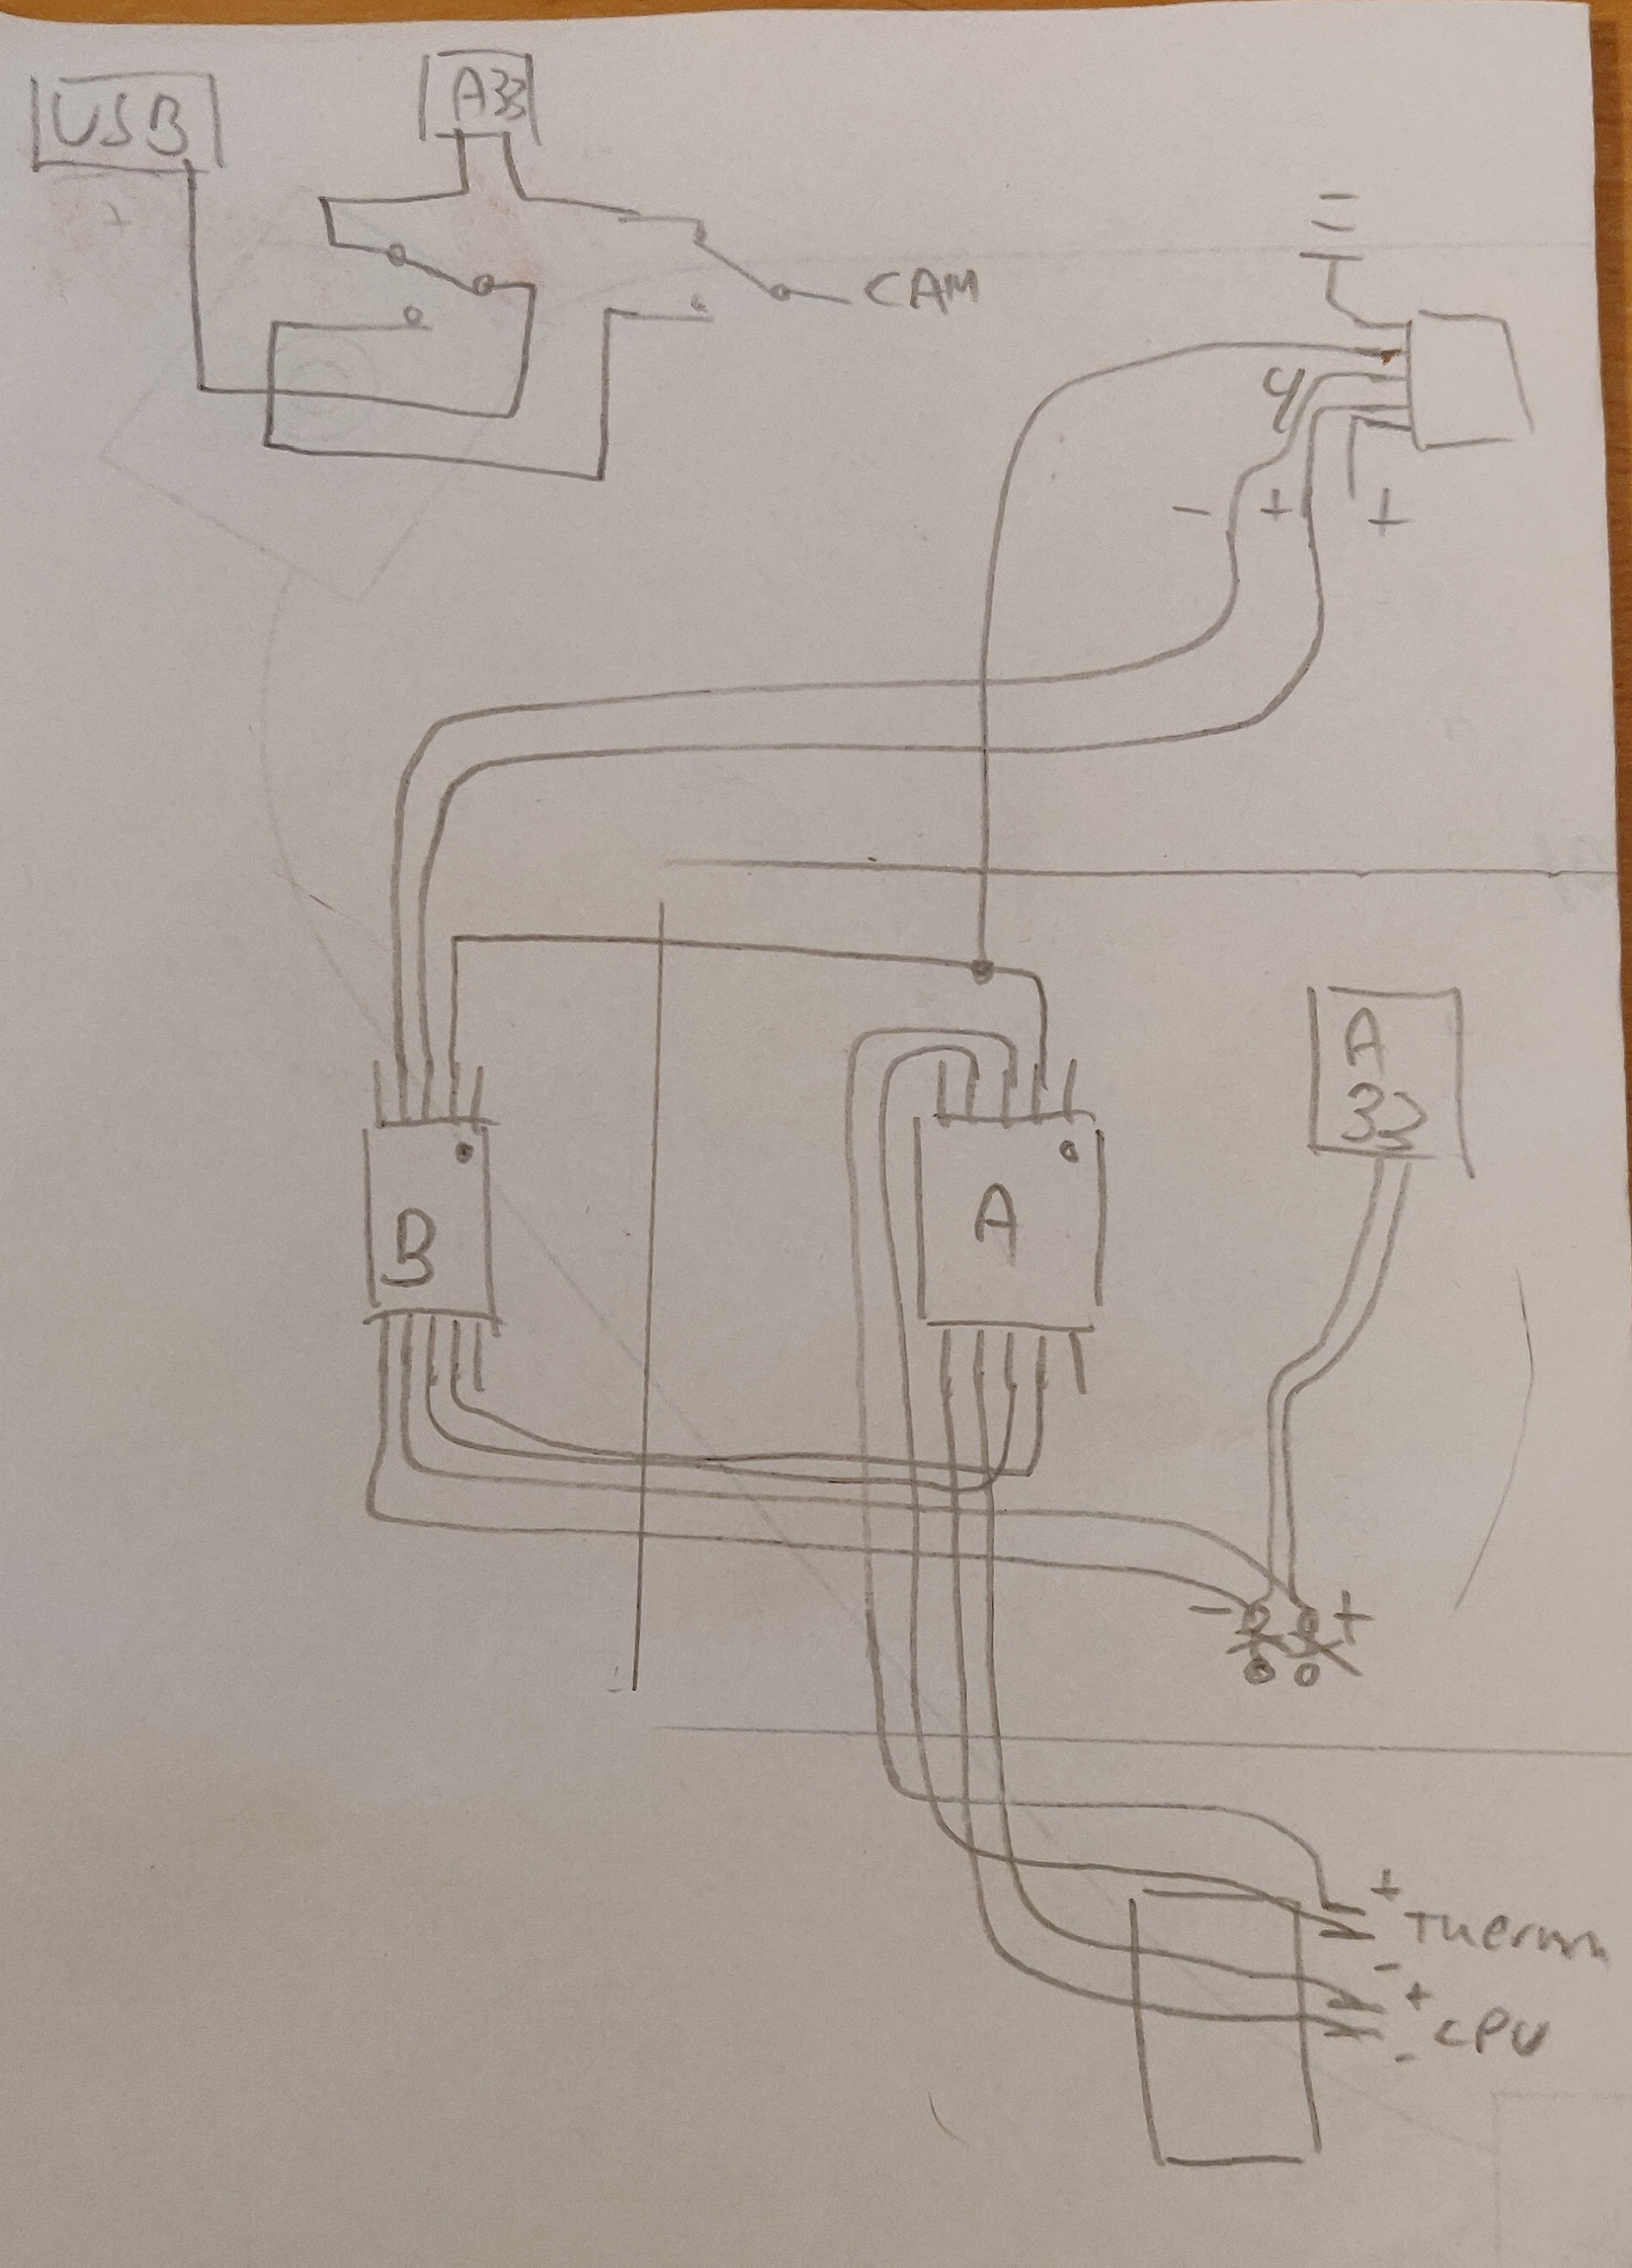
What we’re looking at is my ugly hand drawing, showing the two DPDT (Dual pole Dual throw) switches that allows us to cut the connection between the CPU and it’s devices. In this case we disconnec the USB port for charging and data and the Thermal Core and then reconnect these two devices so we’ll end up routing USB data from the Thermal core out the USB port, without the CPU internally doing any work.

We can handily do this since the 3.3V rail is alive when the camera charges. When the USB cable is plugged in for charging the display comes on, the charging symbol is shown and the screen is turned off again. Behind the scenes the CPU is still running (although in a low-power state i believe)

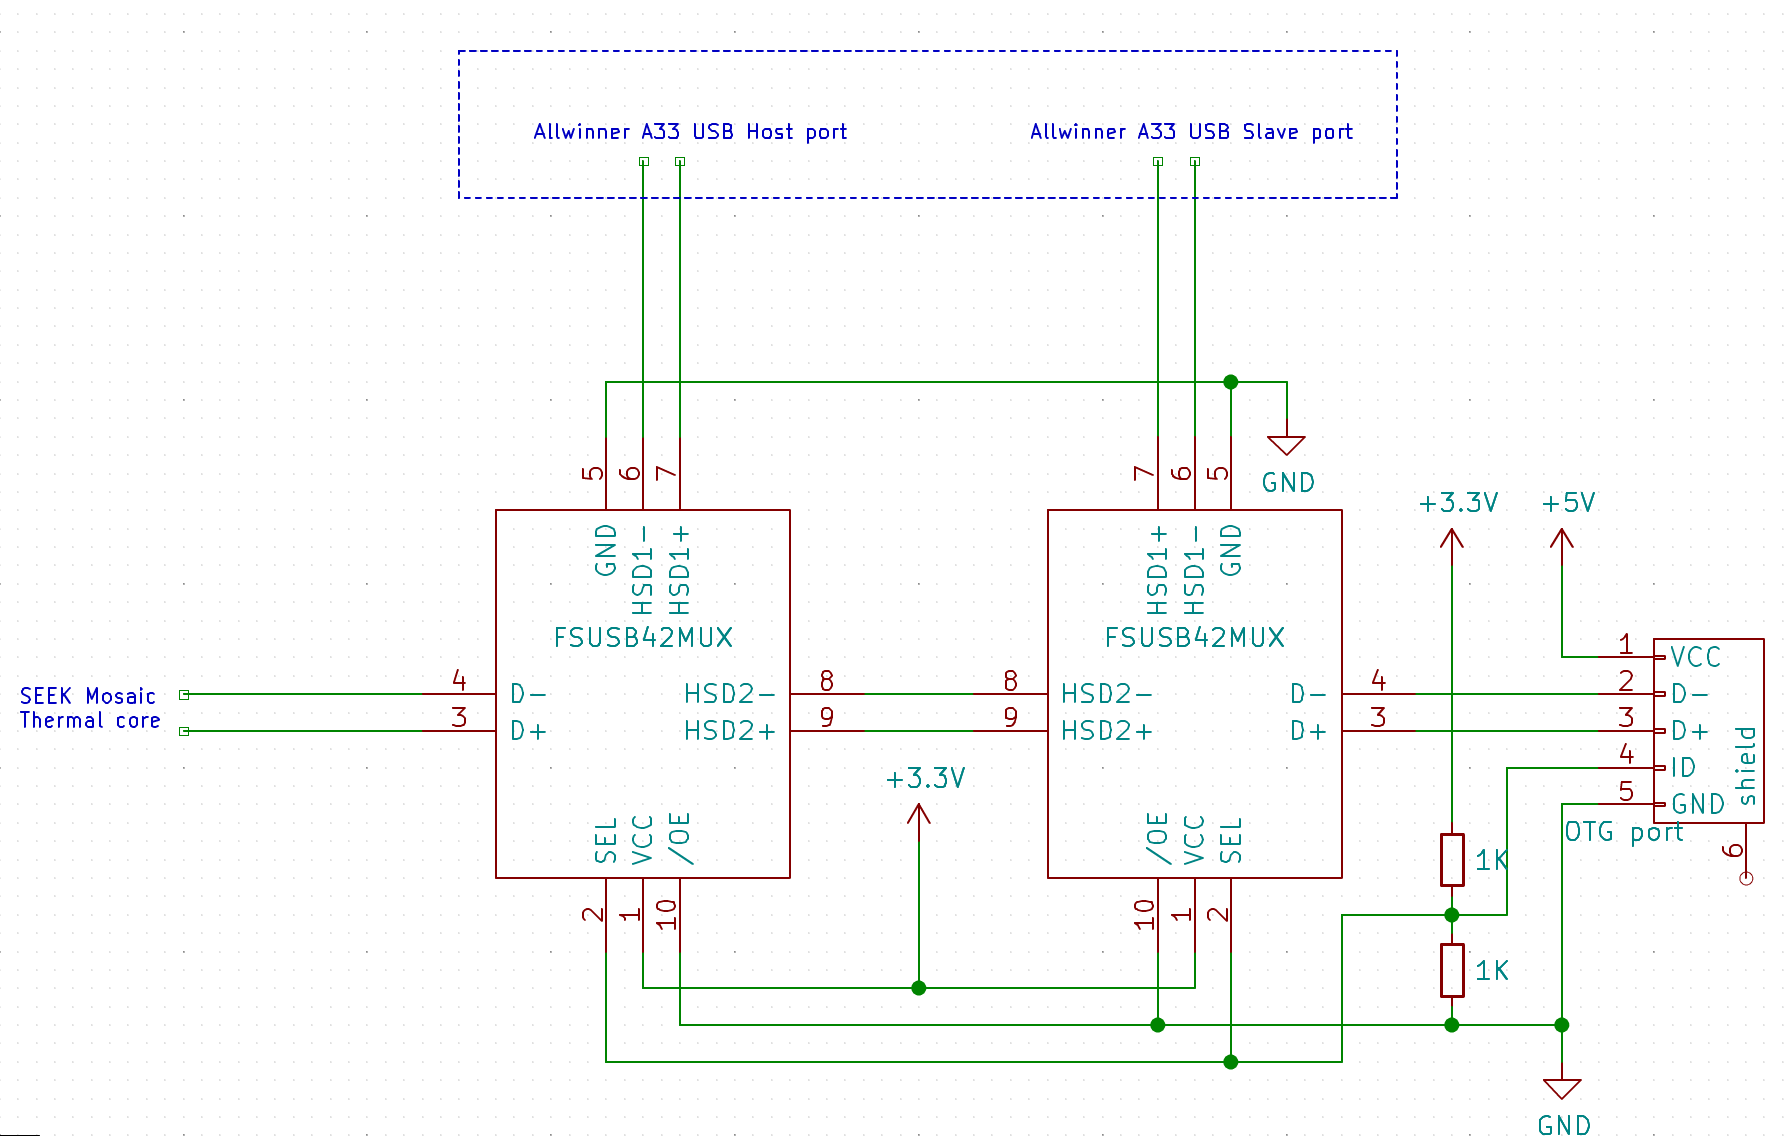
If you would rather look at a proper schematic i’ve drawn it up in KiCad for your pleasure as well. Be aware that i made a mistake in the schematic. The upper 1K resistor does not go to 3.3V. It goes from the ID-pin of the USB-plug to the SEL-signal on the chips, and from there to GND via another 1K resistor. This is to form a voltage divider and pulldown from the 5V USB to the chips that only support 3.3V!

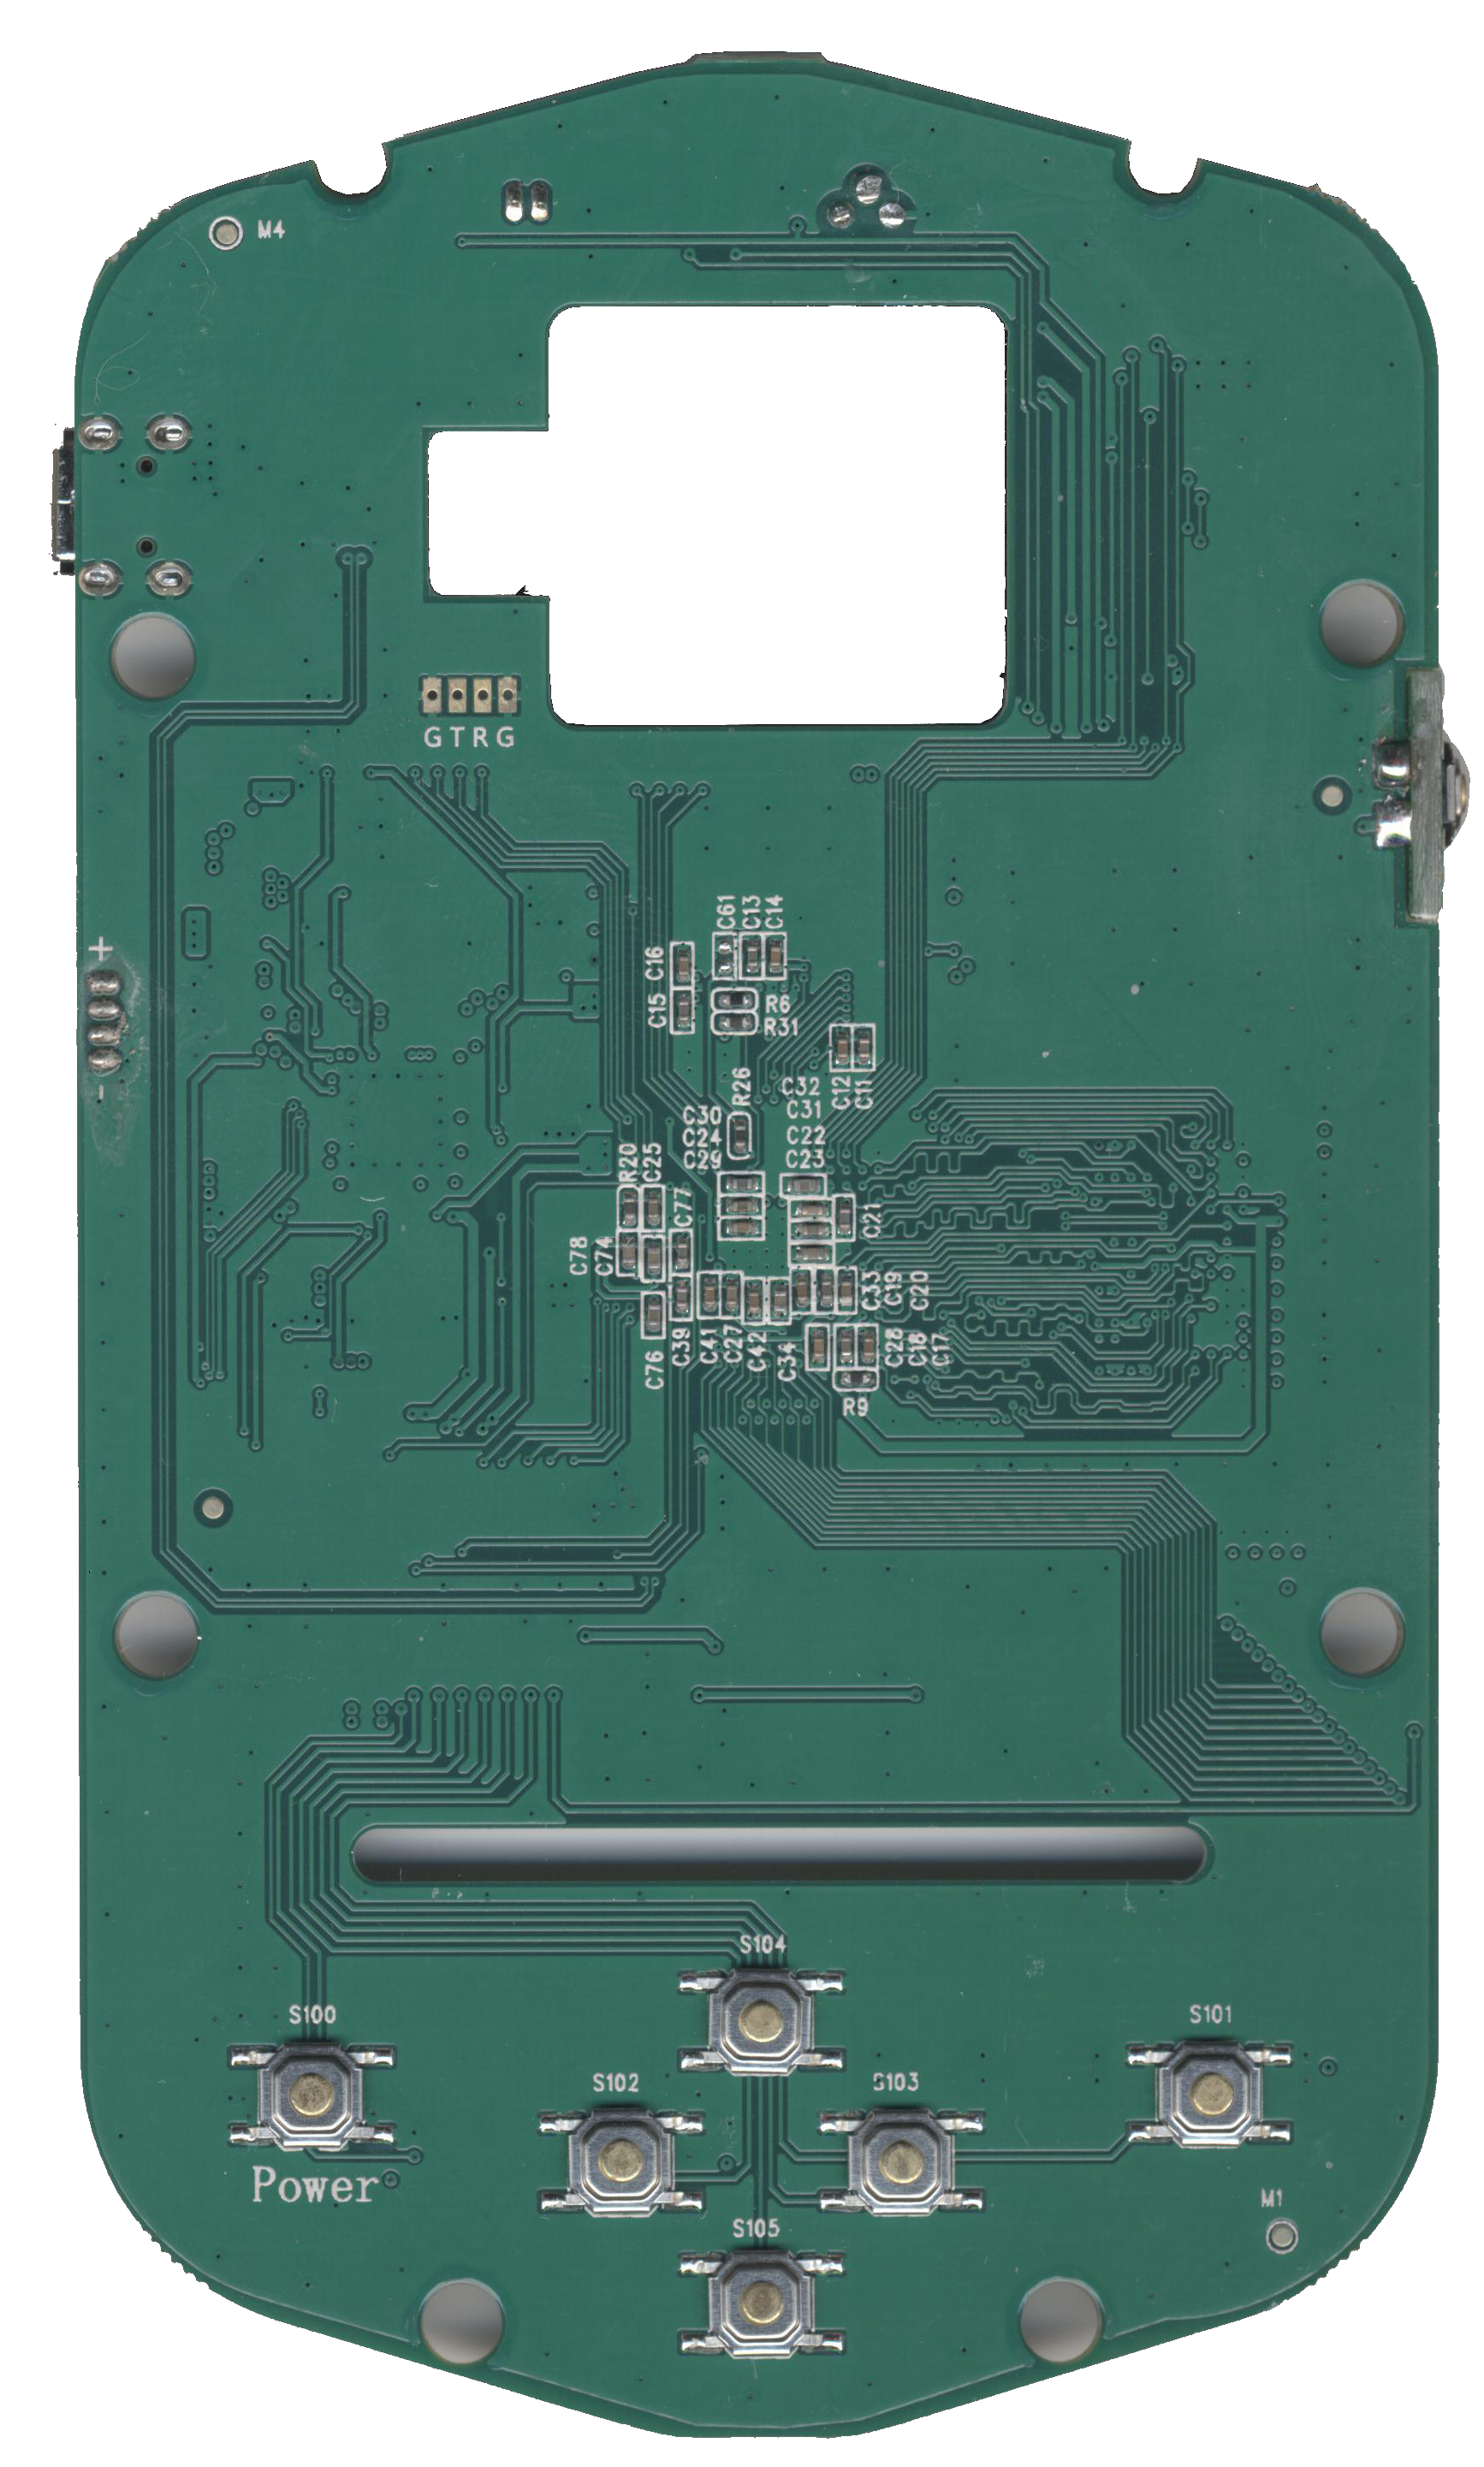
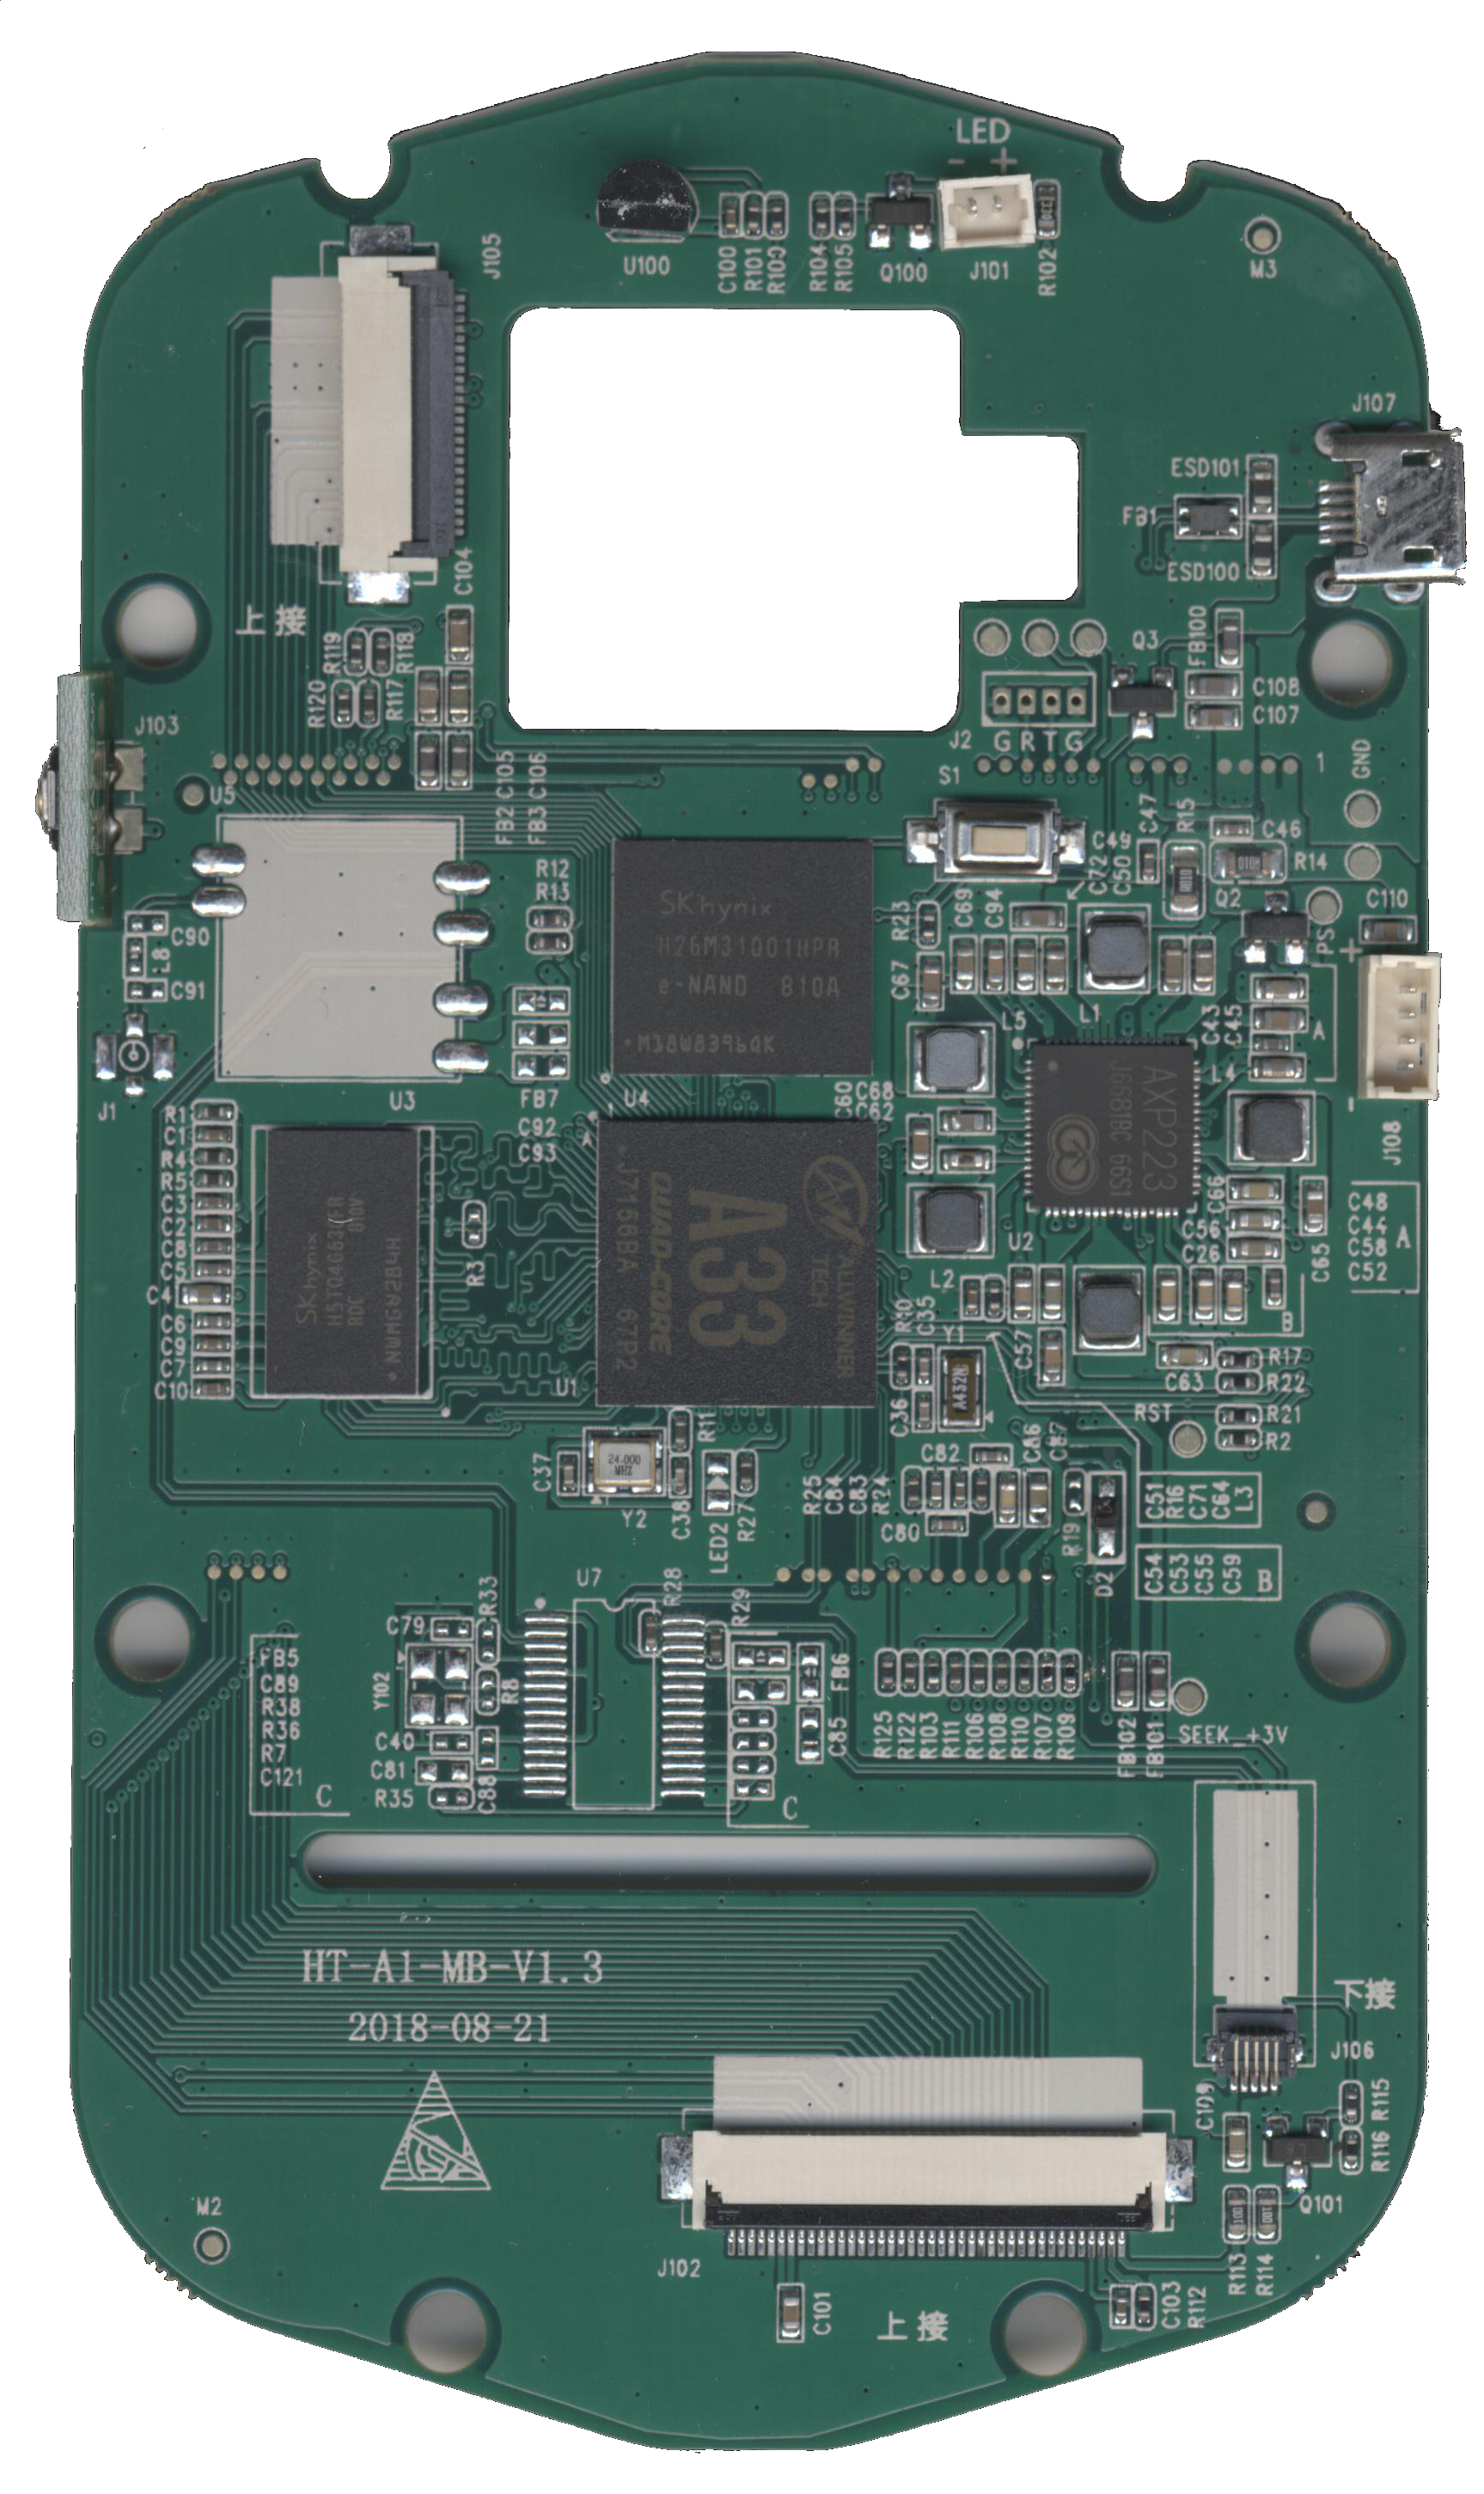
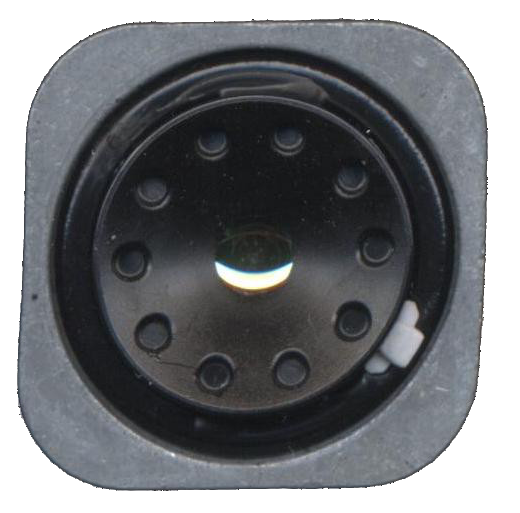
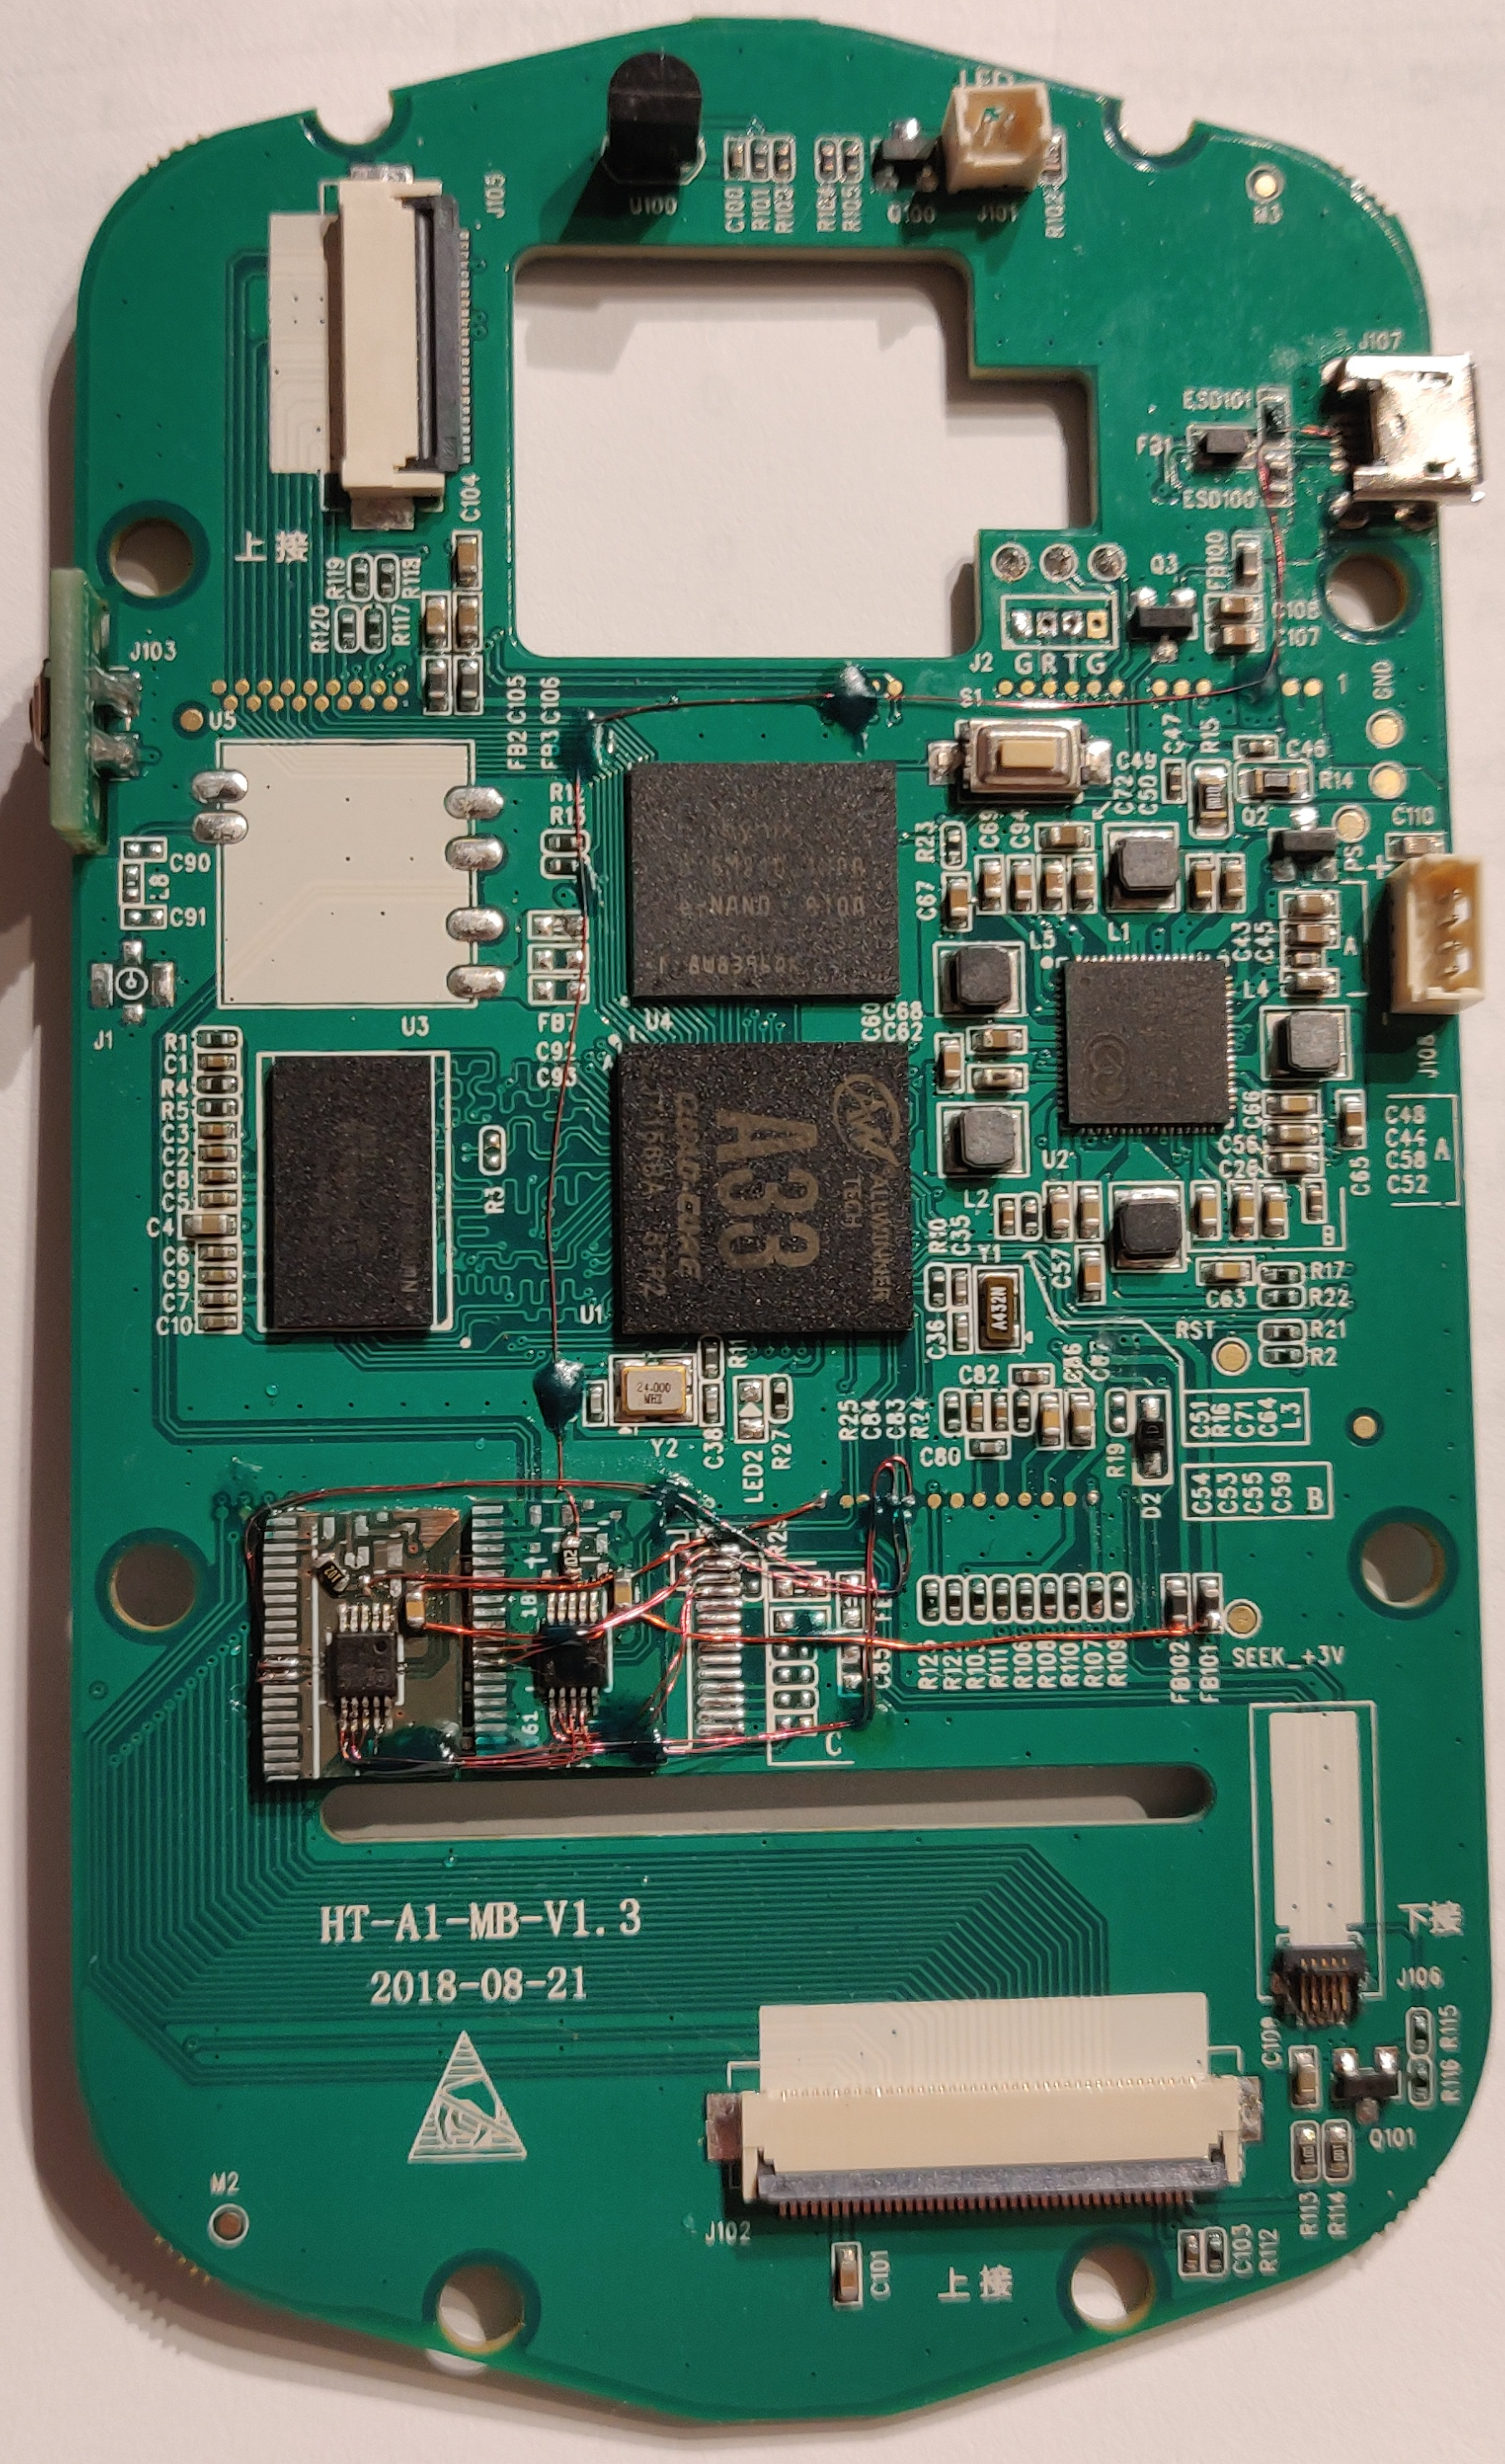
We need to cut the USB data stream on the PCB. There is some zero ohm resistors on the two data lines from the Thermal core to the CPU, situated where the GL850G USB HUB would have been situated (R28, R29). If i remove these i can access the data on what would have been pins 25-28. We also need to break the path on the lines from the USB connector for the outside world. This can be done just where the signals go from the bottom layer, trough a set of vias and to some testpoints. The solder mask is removed on the vias and the trace is cut between via and test points.

So if we switch these data lines around while the 3.3V rail is alive and the sensor has power we should be able to route the USB data out of the device.

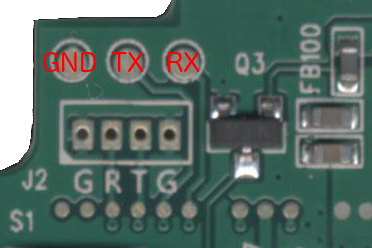
But how do we trigger this? One could use a small micro processor and hook into the buttons and do something like holding down a key on the front while plugging in, that would enable the switch – but i went with a simpler solution. The fourth pin in the USB connector (the ID-pin) is not used in the HT-A1 so it’s open for playing around. If i make a custom OTG cable that goes from my phone to a micro USB plug with the ID pin pulled to +5V i can trigger the switch. This would allow me to plug the phone into a HT-A1 that is turned off. It will start charging and be immediately ready for the phone to initiate USB data transfers. Cool, huh!

I have a bunch of scrapped circuit boards from my employer which employs some circuitry where a USB signal is switched around with an analog switch that is rated specifically for USB data signals, the FSUSB42

This chip comes in two variants. Piss annoying housing (UMLP) and just downright annoying housing (MSOP). Both are a chore to hand solder point-to-point so i got the idea to cut out a portion of the board with the chip. It’s not pretty but it sure gets the job done. There is oodles of place behind the mainboard so the extra couple of millimetres doesn’t really pose a problem.

So i took my trusty Goscut Eclipse 2000 plate shears and cut out the wanted portion of the PCB. I did this twice since i need two DPDT-switches.

So i took these two cutouts, placed them in a vacant spot on the mainboard and started wiring with enameled magnet wire. This is a great way to spend a Sunday evening btw – Just after easter lunch and a good long walk with friends in the city.

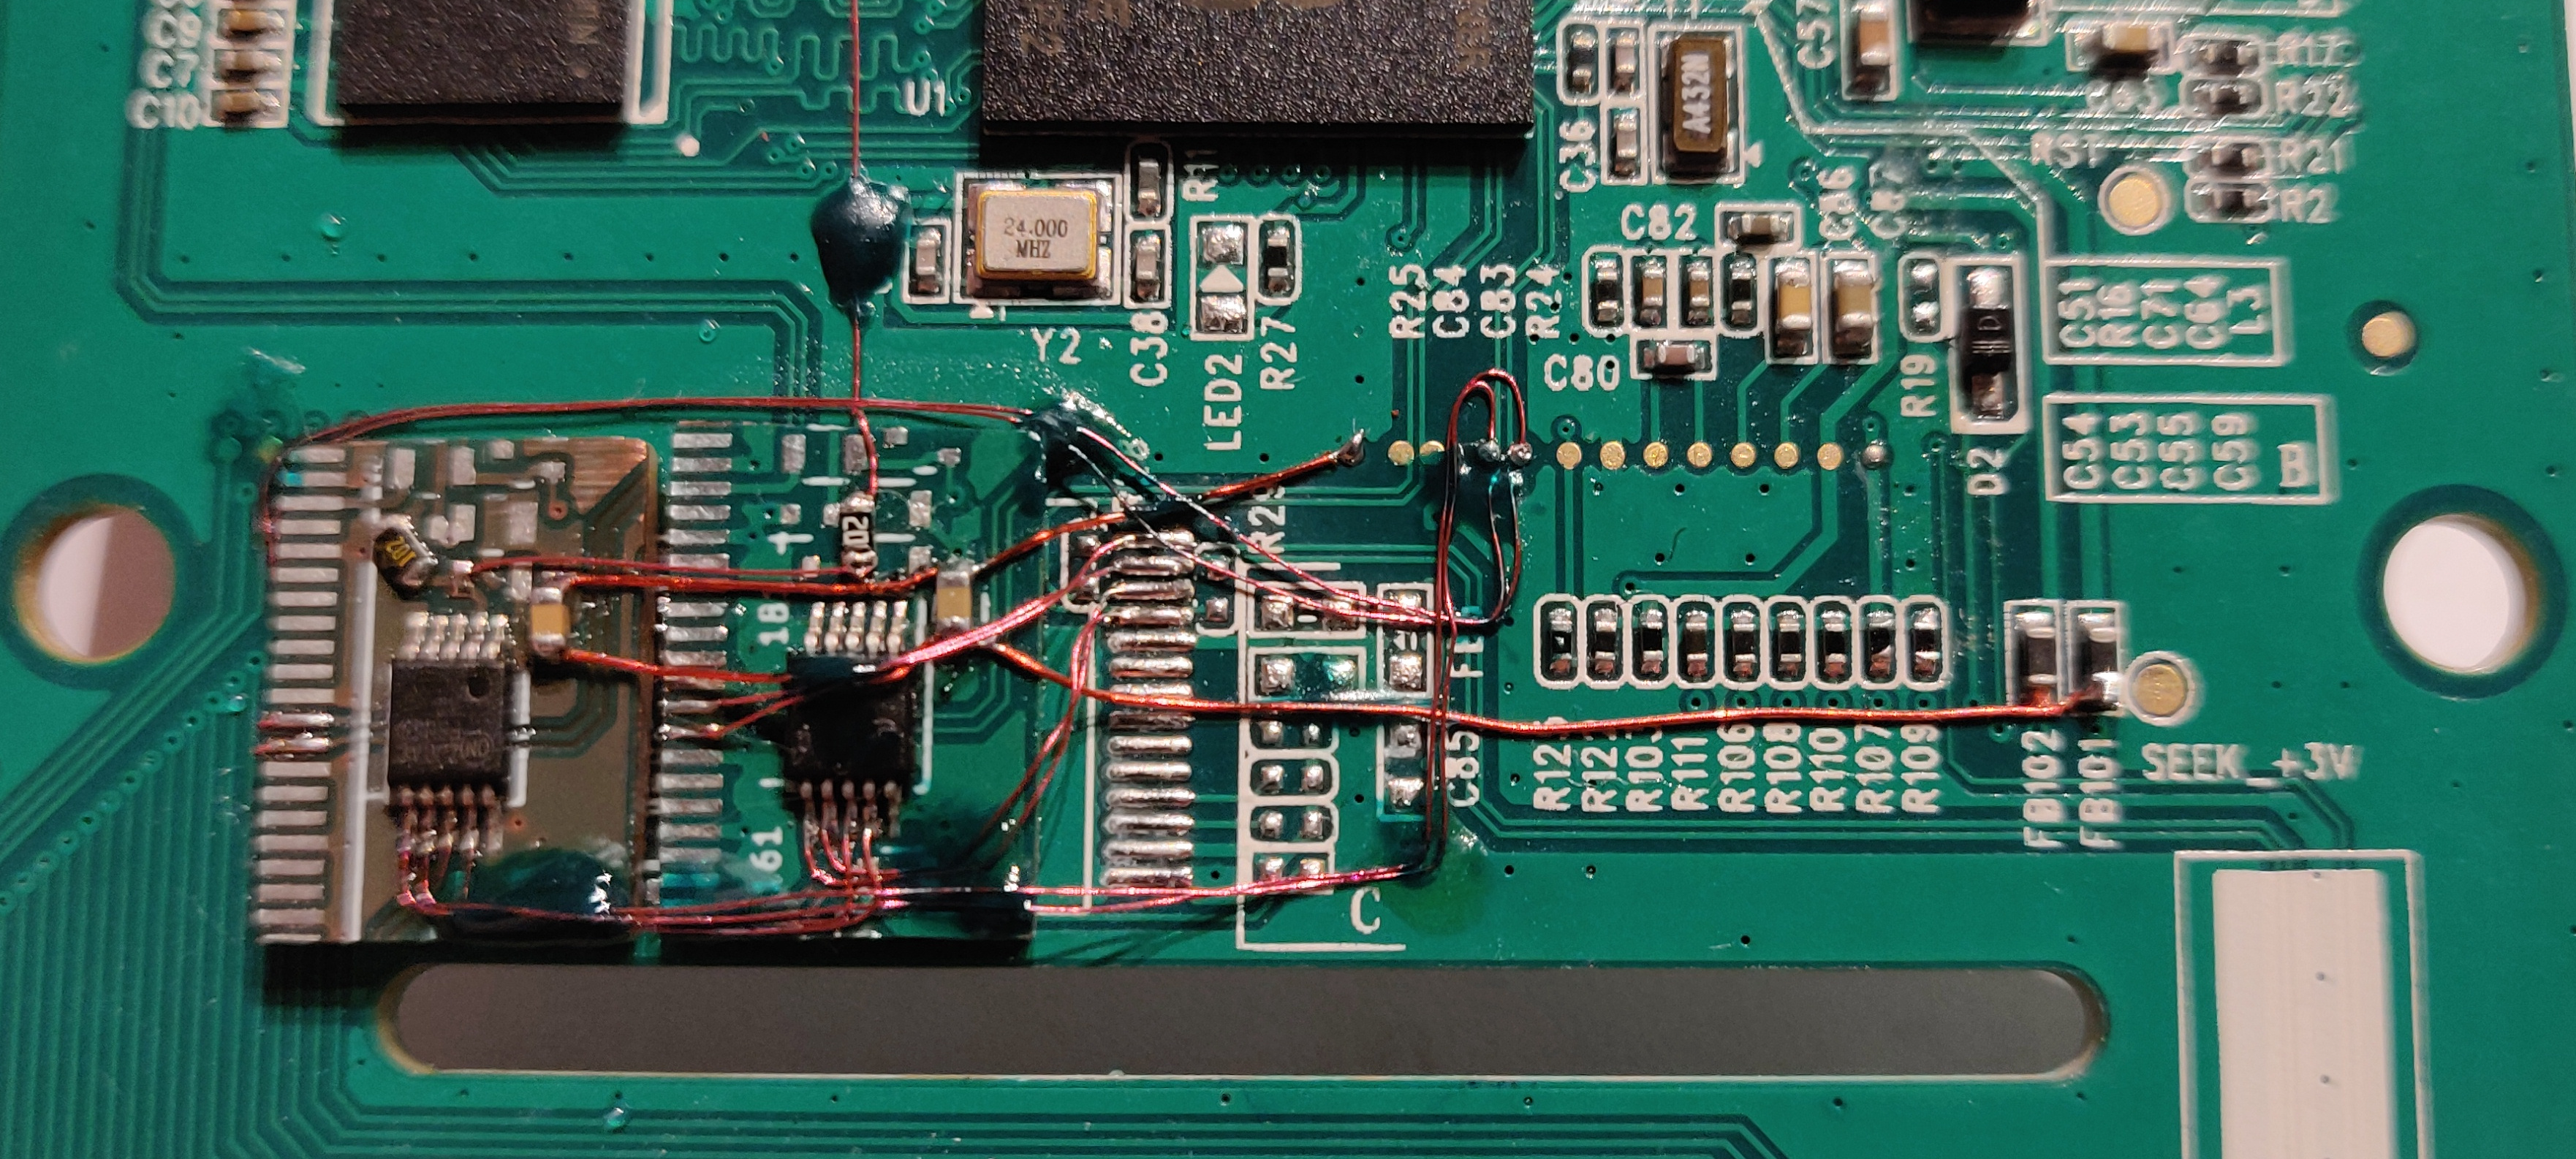
I use green UV-curing soldermask to hold the wires in place. Once i’ve placed a few wires i lock them down with a drop and cure the glue quickly with a 405nm laser pointer.

The finished article look like this. Not too bad if I must say:

The first sign of life on the phone 🙂
The finished setup. The cable is just a temporary one i made from some parts from the scrap bin

A weird thing i found – the image is upside-down. So i need to hold the HT-A1 upside down or my phone for it to be right-side up. I didn’t find any function in the app to rotate the image 180 degrees around. What do people do that have the dongle and USB-port in the top of the phone?

So where does this leave me? I need to solder a nice, short cable, preferably with some angled connectors so i can piggyback the phone on top of the HT-A1 and use it as a whole. I have some connectors and will probably just 3D-print some casings for it instead of waiting for the slow donkey from AliExpress.

On popular demand, i have desoldered the EEPROM in the Mosaic module and read out the firmware. The file is available in BIN and HEX format here

Any ideas, comments etc – you are very welcome to let me know what you think in the comment section below.

Dec 03

This is part 1 of my hacking adventures on the HT-A1. To see part 2, click here

After having tried to software-hack my old Flir E4 to get a higher resolution, and failed at that (some of them cannot be upgraded for unknown reasons), I was on the lookout for a better resolution device.

Having watched Julian Ilett’s video review of the device, steered me onto the cheap HTI (Dongguan Xintai Instrument Co.,Ltd.) HT-A1 thermal imager.

Almost all the other cheap off-brand imagers i have seen is pretty crap, but this one boasting a resolution of 220×160 pixels, that’s not half bad (compared to my old Flir E4, which was locked down at a measly 80×60 pixels.

Before  pushing the Order button, i went to do some more research and found this teardown video by Youtube user “The Equalizor“.

This reveals that the camera uses a sensor module from SEEK thermal and reveals some other nice details. Go see his video on how to get into the device.

It looked good, so i ordered one using the link on Julian’s video. After approx 3 weeks (whereas one week was it being stuck in customs) it finally arrived. I turned it on and checked that all worked, and then to continue to take it apart 😀

This is not a review, nor a teardown. This has been done before. I will look into what’s happening on the serial interface that is clearly evident on the board, and i will try to figure out what kind of communication protocol there is between the sensor and the mainboard.

The mainboard in all its gory details. All pictures are clickable for magnification.

Apparently the mainboard is a quite new revision (August 21, 2018), and not carrying a CPU-daughter board like on The Equalizor‘s camera.

Looking at the mainboard, trying to figure out how everything is wired together, it becomes apparent that there is a room for a module of some kind, denoted U5. Hmm, GPS-module for geotagging or WiFi-module? The traces going off to J1 with the antenna matching components screams WiFi to me. Who makes a WiFi-module in this approx. 12x12mm footprint? EDIT: I found it, using the right search words on AliExpress: “Tablet WiFi module” – It’s a module carrying the RTL8188CUS WiFi-chip.

What is interesting, when we follow the tracks from this missing U5 module, they go to a missing U7 chip. The data pair from the thermal module also goes here, but is jumpered by two 0Ω resistors (R28 & R29) … Hmm this smells a lot like USB! – What is U7 was a missing USB-hub? I’m thinking GL850G in SSOP-28 housing, a good old classic. A datasheet is available here: GL850G USB Hub 1.07.

So, we know that the thermal imager is running USB communication with the main Allwinner A33 CPU. No need to put the logic analyzer on these lines for hacking – we need to look at that serial port to see what’s happening on boot!

The cable between the sensor and the mainboard, Front and back view.

It carries GND, +3.3V and USB data.

The sensor module itself:

Front of the sensor has a removable lens, held in place with two daubs of what seemed to be hot-melt adhesive. It was easily removed with a scalpel. I am planning to design and 3D-print a tool that fits into the holes in the front to be able to set the focus.

The processor on the thermal module is the NXP LPC4330FET100, a Dual-core Cortex M4/M0 chip. More info here

The camera module is a sandwich of two boards – front board holding the directly bonded sensor (this is pure speculations)

Bottom side of main PCB with the NXP micro holds some support circuitry and a big SPI flash that holds the firmware that runs the module.

On top of the main board, in vicinity of the thermal module there is U100, it’s a bog-standard DS18B20 thermometer for local compensation of the camera’s own temperature. I guess the thermal module does not carry its own temp. sensor.

Some playing around with booting the board without thermal imager or visible camera modules revealed that with both unplugged it will hang indefinitely at the boot screen (but it will still switch off when you press the power button, so it’s not dead behind the scenes). Unplugging only one of the cameras/sensors will have the camera booting happily. Unplugging the visible camera makes all mixed image modes go black. Unplugging the thermal module makes all thermal readings go away, but you can still use the visible module just fine. I guess it was built this way to not die completely if one of the devices went bad, but instead would boot and the user could see what was missing, to go report the error and get the device off for repair.

On the back of the board there is a switch, S1. I tried pressing it while the unit is in operation, no response.

Holding it down while pressing power button yields a device that does not boot, but rather “locks up” – I’m pretty sure this button is to go into some bootloader flash mode. The firmware talks about a “fel button” – it’s for firmware flashing as far as i know for now.

Well this is getting interesting!

The small connector footprint J2 showed to contain no output at all, i scoped it and it’s dead as a dodo.

The three test pads over it on the other hand is alive and well with debug serial@115200 8N1 – YEAH!

Booting the camera with all devices connected will yield this nice bootlog:

HELLO! BOOT0 is starting!
boot0 version : 3.1.0
reg_addr 0x01f00100 =0x00000000
reg_addr 0x01f00104 =0x00000000
reg_addr 0x01f00108 =0x00000000
reg_addr 0x01f0010c =0x00000000
reg_addr 0x01f00110 =0x00000000
reg_addr 0x01f00114 =0x00000000
DRAM DRIVE INFO: V1.5
DRAM CLK =552 MHZ
DRAM simple test OK.
dram size =512
card boot number = 2
card no is 2
sdcard 2 line count 0
[mmc]: mmc driver ver 2014-07-07 16:54
[mmc]: ***Try SD card 2***
[mmc]: mmc 2 cmd 8 timeout, err 0x00000100
[mmc]: mmc 2 cmd 8 err 0x00000100
[mmc]: mmc 2 send if cond failed
[mmc]: mmc 2 cmd 55 timeout, err 0x00000100
[mmc]: mmc 2 cmd 55 err 0x00000100
[mmc]: mmc 2 send app cmd failed
[mmc]: ***Try MMC card 2***
[mmc]: MMC ver 4.5
[mmc]: SD/MMC Card: 4bit, capacity: 3728MB
[mmc]: vendor: Man 0x0090014a Snr 0x012084b9
[mmc]: product: H4G2a
[mmc]: revision: 1.1
[mmc]: ***SD/MMC 2 init OK!!!***
sdcard 2 init ok
The size of uboot is 0x000bc000.
sum=0x0ccccd69
src_sum=0x0ccccd69
set_mmc_para,sdly 50M 0
set_mmc_para,sdly 25M 0
Succeed in loading uboot from sdmmc flash.
Ready to disable icache.
Jump to secend Boot.
[ 0.335]

The rest is not shown here, open BOOT down here under to see the full bootlog.

Raw logs from boot can be found here – some of them is booting without imagers connected, just to see how it reacts:

BOOT

NOTHERMAL_BOOT

NOVISUAL_BOOT

NOTHERMAL+NOVISUAL_BOOT

System is running Busybox, and with some serial debug magic i managed to copy files from system folders to the /mnt/IMGS folder that is exposed over USB. I found all kind of good stuff there – in /boot/ i found logos for other manufacturers (different branding), the cheesy battery recharge-animation – even audio files though the system has no way of doing audio recording or playback 😀


Now, making a new boot logo/animation is next, i think!

Yep, it had to happen: Video of new bootlogo i made in a hurry

I took at backup of the system partitions, and you can get them here:

Data partitions

I decided to order in a WiFi-module and USB-Hub-chip so i can enable WiFi and SSH-access on this 🙂

— I will update this when the parts arrive.

Feb 08

First initial testing, after fixing some minor errors i made in the layout (Swapped RX/TX, not first time) and swapped D & S on the Fets. Grrr…

Dec 17


I am in the process of installing a Nexus 7 Tablet permanently in my Car – Using it for Navigation software and playing music.

I need to be able to tell the Nexus 7 to pause playback of music, and go to sleep. The easiest and most simple way is to touch a NFC tag to it, that tells it to do just this (Using a combination of NFC Task Launcher & Tasker)

But, how to enable the tag at will ?!

Solution: Put a CMOS switch in series with the antenna of the tag – this way it will only be readable when i tell it to!

A good solution is the 74HC4066 or even the DY411DY, but those are just too big an complicated. Why not resort to a single CMOS switch – Enter the 74LVC1G66.

A small SOT353 device that does it all, albeit a bit small for most soldering irons, but nothing my Weller WD1000M can’t handle.

I drew up a board in Eagle cad and milled a PCB. It didn’t work in the first try, it seems I damaged the RFID chip when removing it from the blob of glue inside the tag, so next chip i mounted sits on a big glob of glue, no need to risk damaging another chip!

I the second try, it works perfectly! – The chip needs a supply voltage of 3,3 or 5V and a logic high signal to trigger the Tag “ON”


Here is a Video of it in action!:


Attached is the Eagle files for your perusal.


EAGLE FILES: RFID_brd


Jun 10

A member of Labitat, [Kulitorum] donated around 50 telephones to labitat since his work place scrapped them.

I took one of the phones home to reverse engineer the LCD. After about 10 minutes with the logic analyser, it was clear that it’s based on the Hitachi HD44780 or compatible controller.

Just connect the contrast pin to GND, then contrast is perfect for most projects – unfortunately the LCD is meant to be viewed from an angle, and is not good for a front panel etc. that you will view front-on.

I drew up the connections here:


Some pctures of the LCD and the adaptor i soldered up.


The phones contain some other nice parts, a DC-DC converter module some Xtal’s, Electret microphone, speaker etc.


Jan 01

Some people still come lurking here to see and read about my “Hack Pro” Hackintosh build.

Well i don’t have the machine any more, i sold it and bought myself a real Mac instead.

I will leave the pictures here for your viewing pleasure anyway.